 Managing Accounts
| Document Version | v.4 |
| Document Last Updated | 7/29/2026 |
| Software Version Documented | v.10.2.25 |
Overview
This document will cover how to add/manage your customer accounts. We will also go through each TAB that is available when viewing your customer's account.
To access the Account Manager, go to > Accounts > Manage Accounts from the main menu.
Creating a New Account
To create a new Account go to Accounts > Manage Accounts and within the Account Lookup tab, select the ‘New’ button.

Next, you’ll enter the Account Business name, and address, and select your price class, tax code, and terms.
NOTES:
-
Accounts are typically created under a Business name, vs a Single Customer’s name. ‘Contacts’ are used to add people’s contact info under the Business name (which we will cover in a later section.)
-
If the new account is Tax Exempt, you may check that checkbox here, but a Tax Authority will still be required.
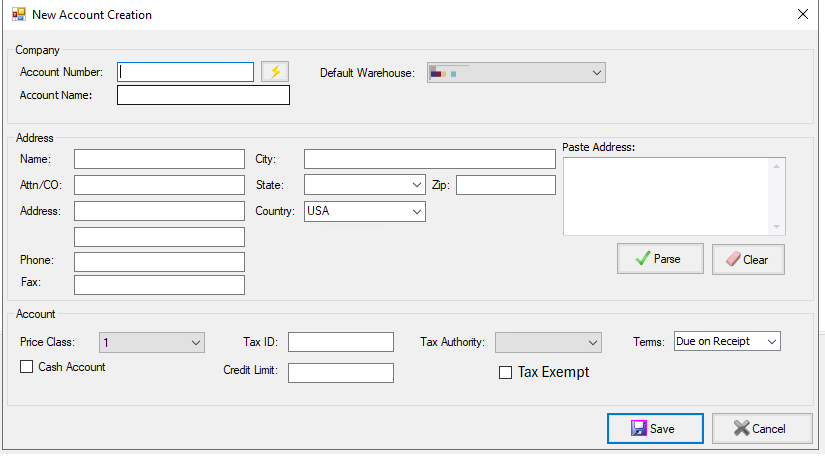
Once you’ve completed entering the Account details select ‘Save’.
Adding Contacts
Accounts are typically created under a Business Name, and Contacts are the individual people that place orders for that business. You can have multiple contacts for one Business Account. To create contacts once your account is created go to the Contacts tab within the Main Account.

On the Contacts tab select the ‘+Add’ button and enter your contact information.

After you’ve finished entering the contact information select ‘Save’. Once you’ve added all your contacts select ‘Save & Close’ to close the Account Manager.
Managing & Viewing Existing Accounts
Once your Account has some history you can use the ‘Manage Accounts’ module to view order, payment, credit history, balances, and more. In this next section, we will go through in detail what information is provided to you in each tab within ‘Manage Accounts’
Account Lookup
Before you can begin you’ll need to lookup an existing account. You can search for an account by its name, state, phone number, etc. Once your search is completed, simply double-click the Account you would like to open. This will bring you to the Overview Tab.

Overview Tab
The Overview tab allows you to view basic information about the account. Information in the Overview section can be changed if necessary. You can also view recent notes, payments, orders, etc. in the Recent Activity section at the bottom.
Below we will go into detail of each section on this screen.

Overview
This section shows general information, such as the name, number, and alpha (shortened name) for the account. You may activate or deactivate an account at any time by changing the Account status here.
Balances
This section shows the current balances for this customer. For example, you can see balances that are past due (after 30, 60, 90 days). You can also view their available credit and credit limit.
Statistics
This section allows you to view statistics on how much activity has been done recently with this customer. For example, you can view how many quotes, orders, and conversions have been within the year and last year.
Recent Activity
Change the Type field to choose what recent activity you wish to view (all types, notes, payments, statements, invoices, and quotes/orders). This brings up all documents for this filer, just simply click the Document ID if you wish to open the document.
Address Info
The Address Info tab allows you to add or edit addresses for this account. By changing the fields at the top you can change the default addresses. For example, if you would like to bill one address and ship to another address you can add two different locations and change the corresponding fields at the top.
To add an address, click the ‘+Add’ button at the bottom and select the address type that you would like to associate to this location. Once you’ve finished adding your addresses click ’Save’ to update the account.

Posting Accounts
The Posting Accounts tab allows you to choose which ledger account you would like to for this account based on the customer’s action. Once one of the listed actions is completed a summary of the transaction will be added to that specific ledger account. By default, we have selected the preferred ledgers.

Contacts
The Contacts tab is where you can add/manage all your contact information for specific people that belong to this account. For example, if you would like to store contact information for a sales accountant, or an employee of the account that usually picks up orders this type of information would go here. Contacts can also be tied to Quotes/Orders.
To add a contact simply click the ‘+Add’ button and name, address, email, phone, etc. Once you’ve finished adding your contacts select ‘Save’ to update the account.

Financial Terms
The Financial Terms tab allows you to decide how this customer will be priced (assigning a Price Class), their Tax Authority, and if applicable a Tax ID. You can also mark them as a ‘Cash Account’ only or set their credit limit, and additional fees.
Please note that if the Account is Tax Exempt, you can check the Tax Exempt box, but a Tax Authority is still required.

Misc Tab
The Miscellaneous tab will allow you to require a PO number on the account, as well as set printing preferences for document types.

Contracts
The Contracts tab allows you to manage special pricing contracts associated with this customer. Once you have manually added contracts into Savance Enterprise, you will be able to add them to this customer within this tab by simply clicking the ‘+Add’ button. Click to increase or decrease the priority to determine which contracts have higher priority.

Promotions
The Promotions tab allows you to specify which promotions apply to this customer. Promotions can be managed by going to Accounts > Promotions Manager from the main menu. Use the arrows to increase or decrease priority.

Web Settings
The Web Settings tab allows you to configure some settings for the web (however, most web settings are configured in the web itself when logged in as an administrator). For example, if you would like all prices for this customer to be hidden and instead show up as “TBD” select the ‘Show Prices at TBD’ box.

Messages
The Messages tab allows you to configure messages that will appear during the order and or shipping process. For example, if you would like the warehouse to know something about this customer before they ship anything, they will receive the corresponding messages left in this field.

Reps
The Reps tab allows you to add an account representative from your system. In the User drop-down, you can select any internal employee to be a representative. For example, maybe you would like to assign a main salesperson to this account, you next can decide their Rep Type (Inside, Outside, Accounts Receivable) and whether this user will receive commissions.

Classifications
The Classifications tab, allows you to classify general information about a customer. For example, you can mark a customer as “Government” or “Non-Profit” for informational purposes. These settings are not required to be set.
 ## Delivery Methods
The Delivery Methods tab, gives you the ability to determine how the customer will receive invoices, shipments, statements, and credit information. For example, you have the option to print, email or fax the documents. To add contacts for email, or faxing simply click the  icon to select internal Savance users or Account contacts so once an action is completed the user assigned will get the document.

Quotes/Orders
The Quotes/Orders tab allows you to view the quote and order history for this customer. You can use the filters to drill-down your search. If you want to view the order details, just simply click on the order link.

Invoices
The Invoices tab shows you if the account has any open invoices. Using the filters you can drill-down to find what you are looking for. To view the invoice simply click the Invoice link to open the document.

Statements
The Statements tab, allows you to view all of this account’s statements within a date range. To view a PDF version of the statement simply click on the Statement link to open the document.

Returns
The Returns tab allows you to track this account’s return history. To view the details of the RMA or Return, click on the Return link under the Return/RMA column.

Notes
The Notes tab, allows the user to leave internal notes for other internal users to view about this account. To view note details, simply double-click the note you wish to view and the details will appear at the bottom of the screen. To leave a note, select ‘+Add’ and create a subject name, and details in the body.

Alerts
The Alerts tab allows you to send out emails automatically when certain events occur. For example, if you would like Monte to receive an email when this customer's credit limit has been reached, you’ll need to first check the ‘Hard Hold’ box at the top. Then click the  icon to add an email from a Savance user or from one of the contacts on this account.
 ## Payment History
On the Payment History tab, you will be able to view how this account has paid and when. You can filter by a specific Invoice number, check number, payment type, date range, etc. You also have the ability to Void, Edit, and change any overpayment action.

Credit History
The Credit History tab will show you a history of all credits for overpayments, or returns for the account. If you wish to write off any of these totals that are ‘Undisbursed’ just highlight the credit line and simply right-click.

Jobs
The Jobs tab will show all associated Jobs, order and credit limits for a specific job.

Inventory Aliases
The Inventory Aliases tab will show you a list of all inventory items this customer has specific customer part numbers for. You can also manage adding/editing their part numbers from this tab.

Inventory Alias Groups
The Inventory Alias Groups tab will show you all Inventory Groups Aliases this customer is assigned to. You can also manage adding/editing their groups from this tab.

Saved Cards
This is where the Windriver Credit Card Processing device can store and Save Customer Credit Card information to use virtually for a client which is all PCI Compliant and stored cryptically in Savance Software.
